Table of Contents [show]
WISMEC Noisy Cricket II-25 & Neutron RDA by JayBo Designs
First and foremost, if you don’t understand and feel confident enough regarding battery safety and Ohms Law, I’d highly recommend you do some research before buying the Noisy Cricket II-25 Mod. Even though there are some safety features implemented that could prevent trouble, there are a lot of things unaddressed and left on the table with little explanation when it comes to safety. I ask you to approach this review with an open mind about the products but make safety your priority if you plan on picking up the WISMEC Noisy Cricket II-25 or the WISMEC Neutron RDA by JayBo Designs.

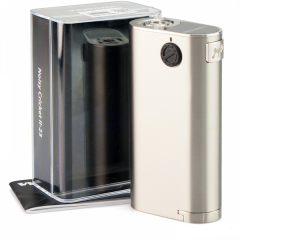
The WISMEC Noisy Cricket II-25 by JayBo Designs is the updated version of the very popular Noisy Cricket Mod. The first generation Noisy Cricket is 100% mechanical with a hybrid connection and safety is in the hand of the user. The Noisy Cricket II-25 is somewhat regulated adding some safety features to make the experience a touch safer. The WISMEC Neutron RDA coincides perfectly with the Noisy Cricket II-25 (but is sold separately and not in a kit). The 25mm two-post Velocity-style RDA comes with extra posts and insulators to convert the build deck from a Parallel or Series orientation. This allows for vertical, quad and many more variations for those creative coil architects out there. This is a double feature review but keep in mind you do need to buy them individually; the WISMEC Noisy Cricket II-25 Mod from $20-$40 at various websites overseas (most US websites are out of stock) and the WISMEC Neutron RDA at Element Vape for $24.95.
The WISMEC Noisy Cricket II-25 by JayBo Designs comes packaged identically as the first-generation mod but sports a completely new design. The original is fully mechanical that runs in Series (8.4V continuous output with no adjustability) and a Hybrid connection (the atomizer’s bottom pin making direct contact with the battery). The Noisy Cricket II-25 is partially mechanical but also regulated ran in either Series or Parallel Mode and has a standard 510 connection. While they share the same name, they are polar opposites of each other.
The Noisy Cricket II-25 is made of zinc alloy (versus Aluminum on the original) and is 9mm taller, 4mm wider and 3mm thicker making larger tanks (25mm in particular) fit perfect. The Black WISMEC logo on top appeared to be a display screen at first glance but is actually there for some visual appeal; it does add a classy touch to a rather simplistic design. The fire button has the signature JayBo logo engraved into it and is excellently placed. It wraps around the curvature of the device so firing in any hand configuration feels comfortable. Comparing the old janky plastic fire switch of the first-generation Noisy Cricket, this is a monumental improvement! There was no information on the lowest resistance you can fire to but a 0.08Ω build I had fired no problem in Constant Voltage Output Mode. CLICK FOR LARGER IMAGE
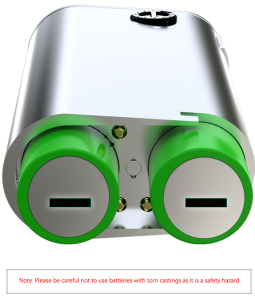
The feature that the WISMEC Noisy Cricket II-25 has that many don’t is the ability to run in Series or Parallel configurations. By sliding the battery cover underneath the mod off which is easy to do without batteries in it, inside of the cover lays a battery circuit board. Overall, the circuit board is very delicate with a tiny half-assed solder job for each of the Gold-Plated battery contacts. On one side, the two (S) symbols indicate Series and by flipping it around revealing two (P) symbols that stand for Parallel. The circuit board just sits in the battery cover without clipping into place. Once you install your batteries and force (and I mean really force) the battery cover shut, the circuit board does stay in place and doesn’t move. Trying to remove the battery door is frustrating since it holds so tightly in place.
In Series Mode, there are two different options to pick from. When the device is off, long pressing the fire button for five seconds will change modes. If the light turns White, you’re in Direct Output Mode. Power depends on the voltage of your batteries and the Potentiometer has no direct effect on your vape. When the light is Orange (it looks more Red to me) you’re in Constant Voltage Output Mode. You adjust the Potentiometer (the small Black circle dial), also referred to as an adjustable voltage divider, from 2V-6V. While this has been done on other platforms successfully, WISMEC did a horrible job explaining how to use it. It looks thrown together out of cheap plastic and adjusting it is very difficult. It took me quite some time to figure out what voltage I was actually vaping on since there’s nothing on the dial. Starting on the number that looks like 100 (not sure why), it feels right under 2V in my opinion. Turning clockwise to the first circle indention is 2V. Every one after that is a half volt (2.5V, 3V, etc.) and when turned all the way to the stopping point, you’re vaping at 6V. According to my testing, those numbers felt accurate and seemed to be on par with what the actual voltage readings were. I tried confirming this with no answer anywhere, including the manual or the WISMEC website. In Parallel Mode, you only have Direct Output Mode (the light will be White) so adjusting the Potentiometer is unnecessary.

Side Note: No matter if you’re running the Noisy Cricket II-25 in Series or in Parallel, the battery orientation will always be the same (Positive side in/Negative touching the battery cover). Don’t make the mistake of installing your batteries the wrong way as its unknown what could happen if you do. Nowhere in the manual or the company website do they state there’s Reverse Battery Protection implemented so be aware every time you insert your batteries.
The Noisy Cricket II-25 runs on dual high-rate 18650 batteries (not included) with a recommended 25A continuous output rating. I purchased four Sony VTC5a batteries (a legitimate 25A 2500mAh cell) specifically for devices like the Noisy Cricket II-25 since they are highly recommended, hard-hitting cells made for any mechanically driven vape device. There are battery sleeves preinstalled in each battery slot. I couldn’t find any information as to why they were included other than possibly preventing battery rattle or for slightly smaller batteries to fit correctly. My Sony batteries slid in perfectly so I left the sleeves in place. Make sure to have an external battery charger since there’s no way to charge them while installed. The LED light backlighting the fire button will illuminate after every puff which will either stay lit (100%-60%) or blinks much quicker (9%-0%). There’s plenty of battery venting underneath which is important to see on all mods.
After a few days of using the Noisy Cricket II-25 Mod nonstop, I finally was able to remove the battery cover that was completely stuck shut. To my surprise, one of the battery contacts on the Series side of the circuit board popped clean off, rendering the mod unusable in Series Mode. This irritated me since I was enjoying it more and more, especially with the WISMEC IndeReserve RDTA.
While I still have Parallel as a last resort, luckily I found the Gold-plated battery tab and after a simple solder, it can be fixed. So my experience started pretty good but ended with disappointment. There are too many safety concerns for me to recommend the Noisy Cricket II-25 to our loyal readers.
With one of the worst User Manuals I’ve seen to date and no details about battery safety or Reverse Battery Protection, this one could be a risk not worth taking. Since WISMEC doesn’t want to warn you about the potential hazards, I’ll throw a huge Red flag on this one.
WISMEC Neutron RDA by JayBo Designs
Even though the WISMEC Neutron RDA isn’t packaged with the Noisy Cricket II-25 (which I think is a good thing), JayBo designed a beautiful, very versatile atomizer.
Crafted out of Stainless Steel and measuring 25mm in diameter, the Neutron RDA complements the Noisy Cricket II-25 extremely well. There is plenty of build space with 2mm post holes all around. If you’ve owned the WISMEC INDE DUO, the build deck and posts will look very familiar.
But JayBo designed the Neutron to be configured in a Series or Parallel configuration by swapping out posts and the insulator, allowing you to be much more creative and safer with your builds.

The preinstalled setup is the Parallel configuration (standard Velocity-style deck) we’re used to seeing with a (+) and (-) on one post and flip-flopped on the other.
You can swap out the insulator and posts for the extras included in the package, which utilizes a neutral post (like the Uwell Rafale X RDA), giving you many other coil-building options such as vertical or quad coil builds.
The neutral post (hence the name Neutron) allows you to install coils that normally would have a lower resistance and have them read much higher. This is a major benefit in higher voltage scenarios such as Series Mechanical Mods (since you should never fire below 0.4Ω on a Series non-regulated device).
On a common build deck, installing two 0.2Ω coils would read out around 0.1Ω, which is basically dividing the ohm of one coil and that being your resistance. On the other hand, changing the configuration (to a neutral post) would add the two 0.2Ω coils together giving you 0.4Ω.
While there’s not much of a performance difference between the two setups, it allows you to get much more creative with your builds on Series Mechanical Mods if that’s what you enjoy doing.
For example, I installed the dual Clapton coils that come included in the bag of goodies. When I changed the posts out and ran it in Series, the build read at 1.06-ohm. When I switched back to the Parallel configuration using the same coils, it read 0.45-ohm. Hopefully you get the idea behind it but do your research and make sure you understand the whole concept before experimenting. CLICK FOR LARGER IMAGE
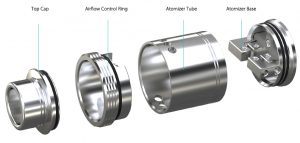
The “Quick Start” User Manual was no help when it came time to swap out the posts but it isn’t too hard to figure out. Removing the posts is fairly easy with two screws underneath the build deck, two up top holding the insulator in place and the 510 pin needs to be removed as well.
The screws are tiny and there are only a couple of replacements included so be mindful of where they fall too. Fitting the pieces is like a puzzle that only took me a few minutes to figure out. There are a ton of really good tutorials on YouTube if you need some more in-depth instructions. Since the entire deck can be emptied, you can clean every crevice of the Neutron RDA.
The side airflow is actually adjustable top airflow with three 3mm holes on each side of the chamber and can be rotated easily by the several layers of knurling on the top cap. The airflow control ring has a channel milled out on each side (Vortex Flow Technology is what WISMEC is calling it) that funnels air in through the side then directly down at your coils.
The airflow is really smooth along with really dense vapor and no leaking issues. The 11.8mm Stainless Steel drip tip is not 510-compatible and serves as the conical top cap producing excellent flavor. The juice well is pretty deep and the way the insulator creates four pockets for your wicks to sit into, wicking and saturation was never an issue.
Noisy Cricket II-25 Final Grade – D
Neutron RDA Final Grade – B
Overall Setup Grade – C
“The safety issues and poor construction of the Noisy Cricket II-25 really pulled the plug for me. The Neutron RDA is definitely a well-built atomizer but for those that don’t get the whole Series/Parallel configuration concept, there are other RDAs that perform at a much higher level. I would recommend the WISMEC Neutron RDA as a standalone product ($24.95 at Element Vape) but until some safety concerns are addressed with the Noisy Cricket II-25, I’d definitely put this one on the backburner; its good idea but poorly executed.”


