Table of Contents [show]
The Frustrating WISMEC Cylin RTA
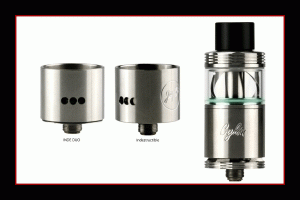
Where do I start? The WISMEC Cylin RDTA, or should I call it an RPTA, Rebuildable Pouring Tank Atomizer is like a complicated puzzle that you give up half way through and never go back to it! This thing is a mess, quite literally! To begin with, this device is broken down into nine total pieces so just cleaning it is a time-consuming process. The only innovative feature is that the RDA portion can be interchanged with other Wismec RDA’s that share the same 22mm sleeve size (Indestructible or Inde Duo). I have yet to experiment with anything other than the WISMEC Cylin single build deck and this review will reflect only that. Because of the difficulty assembling, disassembling and wicking, I had no real time to even enjoy the WISMEC Cylin!

About the WISMEC Cylin
At its core, this is supposed to be an Auto-Dripping Atomizer. The WISMEC Cylin is 22mm in diameter and made out of Stainless Steel. Disassembling it was surprisingly difficult. There are some sharp angles that will cut you if you’re not careful! Just to remove the glass piece, I had to dunk it in soap and water just to get the glass to slide off. I was putting so much pressure trying to pull the glass off that I thought I was going to break it! Taking the deck tube off of the build deck was a hassle. I actually had to grab pliers and hold the deck under the airflow tunnels in place and spin the tube counterclockwise then pull it off. It took me about 10 minutes just to remove this one piece! There are 11 total O-rings holding the WISMEC Cylin together if that’s puts things into perspective!
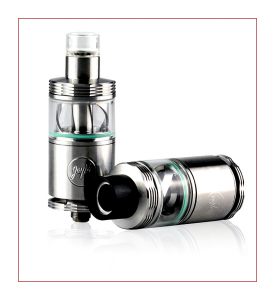
The Black Delrin drip tip measures 11.5mm ID and fits snug around the top cap. Also included is a plastic drip tip that’s 8.3mm ID and fits into the top cap but does heat up at higher wattages. The WISMEC Cylin is 510-compatible if neither of those fits the bill. When changing the drip tip, hold the tank portion down tight or you will pull the tank right off. Wismec did provide plenty of knurling on the top cap so grabbing and removing to fill your eJuice is effortless. Let me repeat, the top cap does NOT unscrew and just pulls right off.
Underneath the top cap is a square cutout that lines up with the top of the chimney which is to adjust the juice flow control. When assembling the chimney, there’s a notch cut into the bottom section where the juice flow holes are. The chimney fits in and locks into place when you line it up correctly. At this point, double check your juice flow is working properly by twisting the chimney back and forth and you should see the juice holes opening and closing. The O-rings holding the glass into place are very strong and is why I had such a hard time removing the glass. Right clockwise closes and counterclockwise opens the two 2.5mm juice flow holes.
Wismec includes two 5mm x 7mm 0.25Ω NotchCoils that work in both Power and TC Modes, fit tightly between
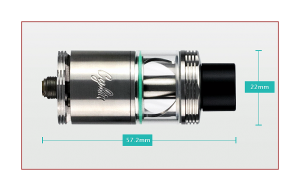
the deck posts but still has room to move around. I was able to fit a 3.0mm ID Fused Clapton Coil with a little room to spare. The space between the grub screws was only 1.8mm so you won’t be able to fit any exotic builds into this build deck. If you like using the Wismec NotchCoils, you could always pick up a 5-pack of Theorem coils and would work great with this deck! Total capacity is 3.5ml of eJuice and is filled through the top juice fill slots. In the package, Wismec includes a replaceable glass section and 10 O-rings which you’ll be replacing often because of all the pulling and pushing abuse these O-rings are under constantly.
The airflow ring is held on by an O-ring under the build deck and surrounds the 510 connection. It flops around and sits very loose when not tightened down on a device. When attached to a mod, it’s almost impossible to properly adjust the airflow. Trying to spin it in either direction will either loosen the Atomizer from the device or start removing the deck tube which will really get on your nerves! Even when filling the tank, I don’t bother closing the airflow holes since they are two completely separate pieces and the amount of time it takes just to complete this small task. I take the tank off, fill it and push it back on the RDA sleeve. Airflow is fed from the bottom up through two 5.5mm x 4mm tunnels and up into the build deck hitting both sides of the coil. The amount of airflow I get is sufficient and feels good while making harder pulls. The 510 pin is Delrin lined and protrudes out the bottom quite far. I couldn’t screw the WISMEC Cylin on to a couple of my devices with shallower 510 connections.
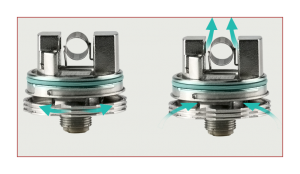
Keep in mind, when twisting you’re coils for the WISMEC Cylin, make sure you have one lead facing 6-oclock and the other at 12-oclock which makes life easier when installing. The single coil build deck was pretty easy to build on besides the housing for the grub screws. What I mean by that is the screws thread in between two pieces and almost just float in place. To make installing your coil easier, you take out one of the screws and loosen the other. Slip one lead under the loosened screw and drop the other lead into the empty slot. Once you can actually get the grub screw back into place, which is challenging to line back up and start threading it in, they tighten down fairly easily. All while holding the coil so it doesn’t shift around while trying to fiddle with the grub screw is maddening and downright frustrating!
There should be a book written on how to wick the WISMEC Cylin correctly! If you’re new to building and wicking, stay away from this ‘advanced users only’ Atomizer! Too much cotton, it won’t wick correctly resulting in massive dry hits. Too little cotton, you might as well just take your bottle of eJuice and dump it on the floor! I don’t want to sound like I’m over reacting but what on earth was Jaybo thinking when designing this? Everything about this tank is miserable to deal with!
The most effective way I found when wicking the WISMEC Cylin is referred to as the Bowtie Method. Feed your
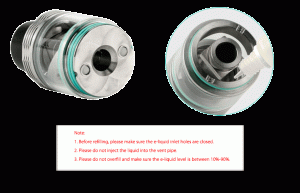
cotton through the coil; leave almost an inch of cotton on both sides. Grab the ends of the cotton and set them into the juice wells on the build deck creating a loop on both sides. Install the deck tube around your cotton loops and back onto the build deck. The top of each loop should be about the height of the notch cutout inside the deck tube. Give the cotton a little ejuice prime and make any necessary adjustments so when you push the tank back on, your juice flow holes will be touching the tops of the cotton loops. Very confusing and took me a couple tries to get that balance of cotton needed to successfully wick this. It’s a pain and the amount of time that was spent trying to get this right was not worth it.
The glass tank section does not unscrew, it simply pulls off and pushes onto the RDA base. The two notches inside of the deck tube and on the bottom of the tank section line up when pushing it back together. By doing this, it lines your juice flow holes up directly over your wicks, supposedly making it wick better. I constantly had to take the tank off and examine the cotton to make sure it was saturated enough or always looking at the airflow holes to see if it was leaking. Not a fun experience at all. Once you fill up the tank and push the top cap back on, you will notice it doesn’t seat all the way down. Put the tank and RDA section together and open the juice flow control. Then any air will get pushed out and the top cap will seat securely.
You can’t see the juice flow holes after filling your tank. After opening the juice flow, this thing doesn’t drip, it waterfalls your juice through your cotton and right out from underneath! Even installing excessive amounts of cotton it still flooded! If there was a way to only open the juice flow control part way you might have a better experience. By implementing a system like the Aromamizer with different juice flow intervals so you can decide how much juice hits your wicks would really make a difference here.
After the fourth attempt at wicking this properly, I was finally able to get about 20ml of juice through it and it likes to drink juice very quickly. The cloud production for a single coil 22mm tank was surprising and was producing some seriously dense clouds! The flavor was disappointing considering this is supposed to give the Dripper Experience, but the flavor was below average. Lots of condensation! Under the build deck and all the way from the drip tip down the chimney. It was the most I’ve ever seen to be honest! I thought the tank was dribbling out from the airflow but it was only condensation! For those few tanks, I was constantly taking the top cap off and taking the tank portion off to check the cotton. In other words, I was basically stripping the tank after a few pulls! I had to adjust the cotton several times for it to even wick just to get a decent vape! You probably think why would I keep trying to get this right? It almost became a challenge I had to complete and I wasn’t going to let the WISMEC Cylin defeat me!
WISMEC Cylin – Bottom Line
Overall, this was the most aggravated I ever have been with a vaping product! Even disassembling the WISMEC Cylin when I first received it, I had no idea what I was getting into. There are multiple other products I would recommend other than the WISMEC Cylin! Even with years of experience and building knowledge, this will be difficult and just flat out not enjoyable. Isn’t that why we’re vaping enthusiasts in the first place? To have fun and enjoy the art of vaping, right? If you’ve had a better experience, please comment below. I would love to hear any feedback and suggestions!
Final Grade – A big ‘ole F
“What a headache! The only thing I somewhat liked is the look. Trying to explain how to use this to someone is a monumental task! With a 25% wicking success rate, a million problems plus more, don’t waste your $24.99! For the hassle, time and frustration this device will cause you, I would do a U-turn or push Page Back and buy any other Atomizer other than the WISMEC Cylin!”
In The Box:
1*Cylin RTA
1*Glass Tube
1*Transparent Mouthpiece
2*Notch Coil (5mmx7mm) (not installed)
1*Cotton (not installed)
1*O Ring Kit (10 O rings)
2*Hexagon Screw (M2.5×3)
1*Hexagon Wrench 1.25mm Drive
1*User Manual


