Table of Contents [show]
The Infamous LowPro RDA – Review And Tutorial
by J. C. Martin, III
LowPro RDA: $55 – $75
The only Vaper who does not want a LowPro RDA is someone who already has one, or someone that has never heard of the LowPro RDA. The LowPro RDA is small, powerful, mammoth. In fact, it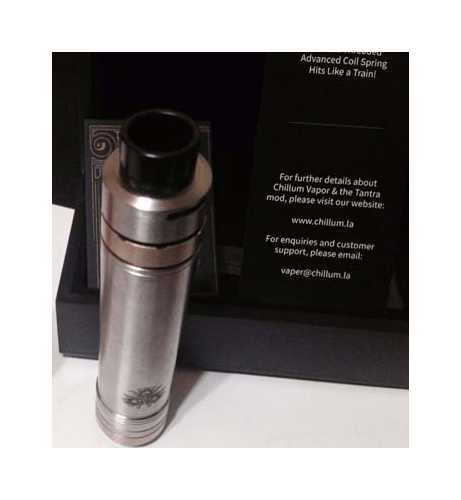 is the shortest RDA to come to market so far. Not counting the wide-bore drip tip, the LowPro is just 10mm tall. No other RDA is like it, and in this review/tutorial I intend to explain how to easily build coils for it, and to point out its obvious attributes. I’ll also include some photos so you can see what I am talking about –nothing too complicated.
But first, let’s take a look at the features and specs.
Product Features:
22mm Diameter for a perfect fit on most mods
10mm Base to just right before the beginning of the Drip Tip
14.5mm Full Height with drip tip
10mm Dual Slotted Airflow
◦ 10mm x 2mm
◦ Single Airflow Option
◦ Fully Adjustable
3.5mm Deep Juice Well
Deckmilled Negatives
Squared Base and Insulator Center Post
Silver Plated Positives
12mm Competition Bore Built-In Delrin Drip Tip
Delrin Honeycomb
◦ Spitback Protection
◦ Airflow Disruption
Additional Squonk-Ready Center Pin
The Shortest RDA to Date
What’s In The Box?
One LowPro RDA
One Additional Honeycomb Delrin Piece
One Squonk Ready Center Pin
Additional Screws, and Screws
Overview
The LowPro RDA allows for vast number of dual or single adjustable airflow settings, a 3.5mm deep eliquid well, a stylish and post-less ‘build deck’, and a squonk-ready (bottom fed) additional center pin.
The LowPro RDA offers a unique method to the ‘build and post construction’, by taking advantage of its cross deck post system, which features ‘negatives’ milled from the outer rim of the device and, in addition, an isolated positive post.
This unique approach enables a myriad number of build possibilities, including single and dual coil builds. The positive post is plated with real silver to give the LowPro RDA a very high level of electrical conductivity.
With a 10mm by 2mm airflow system for both single or dual airflow settings, it allows an incredible amount of airflow. However, for Vapers wanting a more flavorful vape the airflow can be choked down with a simple twist. The LowPro RDA includes a Delrin Honeycomb Filter that reduces hot and annoying spit-back, and connects to the 12mm competition-sized wide-bore drip tip.
There is so much more to the LowPro RDA then meets the eye.
A full feature list and an unbelievably thin form factor, the LowPro RDA is the ideal RDA for true stealth vaping. It certainly isn’t the cheapest RDA on the block, but vaping with it just once will make a believer out of you, at least it did for me.
I own several RDA’s now and each one offers something the others don’t have. The LowPro RDA is the same way, but since getting this tiny RDA I’ve been using it a lot more than the others. I have a feeling that this honeymoon period is going to last quite a while.
Now, let’s get to some coil building with the LowPro RDA!
Proper Coil Construction
To ready a LowPro RDA properly for vaping with it for the first time, simply wrap two 7-wrap coils with 26 gauge Kanthal wire on a 3mm winding rod or comparable rod about the size of a common ice pick. Extend the ends of the wire so that the coils run in a horizontal, parallel fashion. If desired, leave just enough length on the ends of the wire to curl them for the tightening screws. Insert the two coils; tighten the screws down; and test the RDA on an ohms reader. The reader (or a good mod with ohms display) should read between 0.1 and 0.7 ohms or so.
Activate the coils with the top of the RDA off while blowing on them, to ensure cleaner coils and better resistance. Let the coils cool and remove them. Ready and insert some organic cotton into the coils, and place the coils in the RDA. Re-tighten the 4 screws. Remember to line your coils up with the air holes, while protecting both the mouthpiece and the deck with more than 1mm of space. Add about six drops of e-liquid and replace the top of the RDA, and you are ready to vape…
Some people enjoy using a single coil in the LowPro RDA. For my personal preference it is better to use two coils (dual coils) because the resistance is lower. People sometimes install a single, more advanced coil running diagonally, be it a Clapton or Zipper coil, but I prefer the dual coil design to protect the bottom of the RDA from excessive heat.. I do not recommend coil wire larger than 24 gauge for the LowPro RDA. You just do not want a nasty looking burned deck separator.
More On Clapton and Zipper Coils
What is a Clapton Coil?
A Clapton Coil uses Clapton Wire, which is a 28 gauge A1 Kanthal core with 32 gauge A1 Kanthal tightly wrapped around the core wire to create a guitar string looking wire. The Clapton Wire was created (we believe) for the first time by a guy named Derek Small. These Clapton Wires are then used to build the coils for your RDA. Recently Atom Vapes has released a line a Clapton Coil coliheads for the more popular sub ohm tanks.
A Clapton Coil acts like a wick on their own. eLiquid will spread around through those little channels on the coil and provide more surface area for the liquid. These types of builds are also great for getting the best use out of wire that has too high of a resistance to push higher wattage through the coils.
What is a Zipper Coil?
A Zipper Coil is two separate wires of 7 strands of round 30g Kanthal twisted together with a drill, that are then wrapped with the wires twisting in opposite directions side by side with 5 wraps. The effect of a Zipper Coil is very much similar to the Clapton Coil builds.
If you have the patience, there is a way to build two miniature Clapton coils or Zipper coils for the LowPro RDA – build your advanced coils as you normally would, but simply use wire smaller in diameter and small enough coils to protect the deck. Is it okay to use Ni200 or Ti wire with the LowPro? Absolutely –of course you’ll need to have access to a temperature control device with Ti/Ni200 setting capabilities in order to enjoy your efforts. Ni200 and Ti wire can lead to even lower ohms readings and can promote more efficient battery and e-liquid/e-juice consumption.
Photos and Thoughts
Here are a few photos and notions in regards to their contents. The mech mod I like to use with the LowPro RDA is a “Chillum Tantra.” An awesome mod, its reinforced spring sets it apart from many other 18650 battery mods. The wire in the photos is actually 24 gauge Kanthal, though 26 gauge is a better choice for that particular metal.
The photo below shows my first build for the LowPro RDA. While it looks fine, this is the wrong way to do it. Why? Notice how close the coils are to the center of the RDA – they should be closer to the air holes. See the wire from the coil to the screw is not straight? It should be. The ohms reading is okay, however I did pull these coils out and start over to promote better air flow and deck safety.
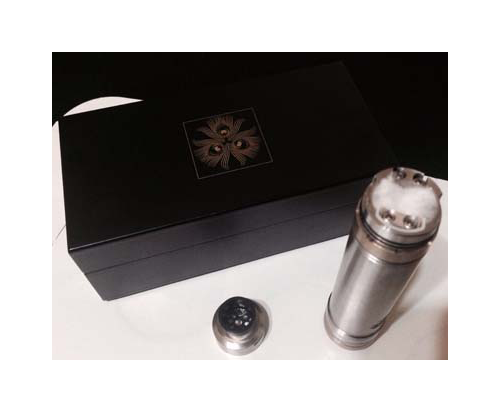
The rest of these photos were taken as I rebuilt the above coil structure. The photo below shows a Tantra-Low Pro setup –hard to beat it.
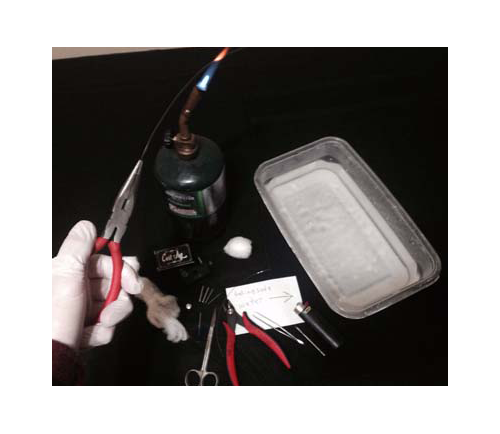
The photo below shows the tools I use the most often and how I straighten Kanthal without using a drill bit –by passing the new wire slowly through the flame of a torch. I use the coil jig for making coils. The cotton is Japanese organic cotton. The torch has a life of about 70 hours; using baking soda water can reduce the resistance of the wire as well and cools it quickly upon its straightening. The torching process is not really necessary; however the wire is easier to work with when the technique is used.
Remember to remain safe when building coils.
In the photo below you can actually see the wire in the flame of the torch. I pass the wire through the flame just slow enough for it to turn orange at an ‘even’ pace. Then, I immediately submerge the wire in a baking soda water trough. Two teaspoons for one cup of water is a good mixture for baking soda water. If you do not have a ‘trough,’ a plate will work fine.
The photo below shows a coil on the jig, one that is ready to ‘ready’ for installation and wicking, and the LowPro RDA with its top on the side. 5 or 7 wraps is good enough; but I think these were seven-wrap coils. They worked fine to make very large clouds of vapor. One would think the vapor clouds would be hot due to the coils being close to the mouthpiece – this is not true. The vape is cool and always full of flavor. With 6 or 8 drops of e-juice, which is about 1ml, I can usually take at least 5 ginormous cloud inhales –nothing funner.
The photo below shows the ohms reading on my Drok reader, a small ohms tester which can be recharged with a USB cable. Stylish and fun to use, I cherish my Drok reader. The coils in the photo are not perfect, however they worked fine. When you build these coils with 26 gauge Kanthal, they will be smaller. I plan to rebuild them with 26 gauge Kanthal, next time I build coils for the LowPro. Notice the air holes of the RDA; are they not becoming? Air passes directly upon the coils, cooling the evaporated e-juice as it goes up through the ‘waffled’ mouthpiece. It is said that the mouthpiece is made that way to keep e-juice from coming up into the 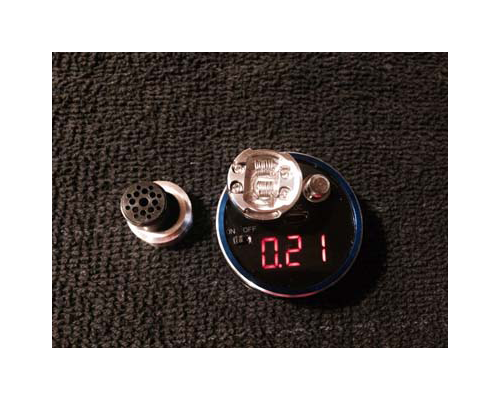 user’s mouth (spit-back) while evaporating. It can also be used to drop e-liquid directly atop of, so the juice can spread evenly over the coils. I have done that; most people would probably chose removing the top in the traditional manner, however.
The next photo shows the Low Pro atop the Tantra before its initial ‘orange test,’ what I call the preliminary coil test before I wick the coils.
The next two photos show the coils heating up as I test them before their wicking.
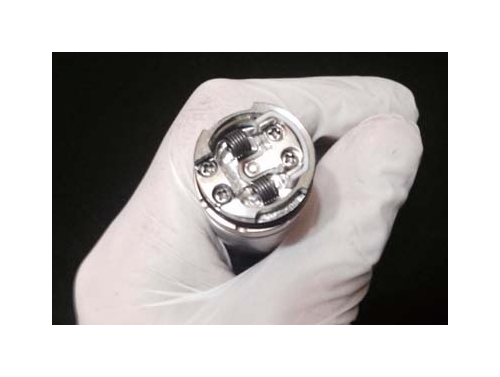 The photo above is one of my favorite photos, as it shows two coils getting super hot. Remember not to let the coils turn white for over 1/10 of a second; such a notion is dangerous, and the coils never have to even turn orange in order to produce wonderful vapor clouds. In other words, other than initially cleaning newly built coils, there is no actual reason for them to get as hot as they are in the photo above.
The photo below shows the coils wicked up and ready for e-liquid. There is no reason to have the organic cotton on the top of the coils, however I tried it that way a few times. It does work out, but you lose some of the normal airflow that way. The idea was to protect the mouthpiece from heat, yet the method is entirely optional and can be used upon your discretion. The box in the picture is for the Chillum Tantra mod –very nice.
Conclusion
In conclusion, the LowPro RDA is a popular choice among people who love to vape. Pros use them. If you do not have one and love to vape, when you do get one, you will be one happy vaper. No doubt. I am. If you want a neato RDA but cannot get the LowPro just yet, or you have a LowPro and want to try an RDA nearer to its size, there are about a dozen popular choices. A few of them are the Zorro, the REM, the Bambino the Hive, and the Thump. I still think the LowPro is the best RDA of these varieties. Thank you for reading this article – your feedback is welcomed. As I was building coils for the LowPro and charging 18650 IMR Lithium ion batteries for the Tantra, I was too impressed to refrain from taking some photos and sharing a few thoughts. Remember to be as safe as you can with coil building and vaping in general.
Vape on.
J.C. Martin III


