Table of Contents [show]
Pioneer4You IPV5 Review
Ah, the Pioneer4You IPV5 – To say that the IPV series from Pioneer4You has improved over time is like saying that a dilapidated shack has been rebuilt into a fine mansion. I remember my first encounter with the IPV3, and how I remarked that the device had to have been constructed in someone’s garage or basement from some 70’s era Radio Shack kit.
The IPV4 seemed much better by comparison. The device no longer looked like a DIY mod, and it didn’t perform like one either. Take a look at your IPV4 review.
Now comes the new Pioneer4You IPV5, and let me tell you, this beast is truly refined, almost elegant, with 200W (10-200W) of sheer brutal power with the latest YiHi chipset, the SX330-200. With Wattage and Temperature Control options, this is certainly the best IPV model yet.
Unfortunately, or fortunately, depending on who you are, the newest, most gorgeous IPV unit, the IPV6 is coming out soon. We’ll have that review very soon.
Using the IPV5
Take note, the following is the most valuable information you can have at your disposal should you decide to purchase this device from Element Vape:
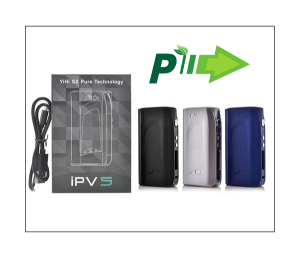
The Pioneer4You iPV5 defaults in SX Pure Mode when you turn it on the first time. SX Pure Mode (in the beginning) is limited to 75W or power. In order to obtain the full power of 200W you must switch the device to Joules Mode… and then select any setting other than the SX Pure Mode. Once you do that, back out of the device menu by getting to Exit On and pressing the top adjustment button. Once the device shuts down, click 5-times to turn it on, click 5 times to get back to the menu, and then each time you click the Fire Button you’ll move through the various settings again. Now switch to Power Mode, then exit, and now you will be able to reach the full 200W. Unless you did it wrong. If you can’t get past 75W, do it again, it will work. In fact, operating the IPV5 is fairly simple.
Basic Functions of the IPV5
The Pioneer4You IPV5 is a 5-click on/off device. It won’t shut down after 5 clicks, you’ll need to navigate to System On, then click the top adjustment button to get to System Off, click the Fire Button and the device shuts down.
When you first turn the device on without an atomizer attached the display lights up and reads, in all caps, CHECK ATOMIZER. Until you attach an atomizer you will not be able to adjust anything, or even fire the Fire Button (FB from here on out).
Inside the Menu…
…is where the action happens, and it is always adjusted through making choices with the FB (Fire Button) and then clicking the top or bottom adjustment buttons to make adjustments to the individual settings, such as temperature or wire choices.
Accessing Menu: With Atomizer attached, click the FB 5 times quickly. The first choice is System On. Press the FB until you get to the mode you want to adjust.
Increase/Decrease Wattage/Power – While in Wattage/Power Mode (click FB 5 times to get to menu, 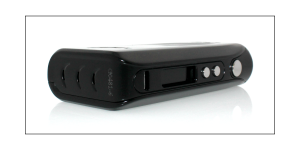 click FB to step through the menu, choose “Power Mode”, press FB to choose Exit On, press top adjustment button to exit the menu), increase wattage by clicking the top (+) button and decrease using the bottom (-) button.
Set Resistance in Wattage Mode – With the device on, but in standby mode, press both the + and – buttons until the Set Resistance option pops up. Use the + or – button to adjust the resistance. Unless you know what you are doing, don’t use this feature as it will have a direct affect on your vape experience.
Joule Mode (Temperature Control) – While in Joule Mode (click FB 5 times to get to menu, click FB to step through the menu, choose “Joule Mode”) – Using the FB, menu on through to UNIT, to choose F or C, for Fahrenheit or Celsius, then move to TEMP, to select the temperature you want (212-572F), then move to Coil Select, and choose the wire type; Ni (Pure Nickel), Ti (Titanium), SS (304 Stainless Steel), SX Pure, and Manual TCR. A word of advice; don’t guess the wire type if your tank and coils are already up and running with e liquid, make sure you match the type of wire to the settings in the IPV5. If you have several tanks you know exactly what I’m talking about. “Did I use a Kanthal or Nickel coil in this???” Hey, it happens.
The SX Pure Janus Atomizer (briefly)
Pioneer4You is about to unleash the SX Pure atomizer that will work fully integrated with the IPV5 (and IPV6 I’m sure). For now, we will probably see this IPV Pure Janus atomizer first, it’s a smaller version of the Pure X2, with 2mL capacity to meet the UK TPD. These tanks are coil-less tanks with a heating element that last upwards of 3 months.
Pioneer4you IPV Pure Janus Features:
2ML juice capacity
22mm diameter x 45.6mm height
Pyrex glass tank section
Stainless steel tank construction
Top-fill design
Uses YiHi SX Pure Technology
SX Pure core heating element can last up to three months
Organic Cotton Wick
Optimal wattage: 5 – 80 watts
Using the SX atomizer with the IPV5
Set and Lock Resistance – Put the IPV5 SX Pure mode while in Joule Mode. Exit out. Press both + and – buttons at the same time to allow the IPV5 to set the resistance read from the coil.
To adjust the resistance manually, use the + or – button (top/bottom buttons) to adjust SX Pure Resistance (at room temperature only). If you try to adjust resistance with a hot coil your settings will not be accurate.
Firmware Upgrade Via Software
Pioneer4You provides software for PC’s that allow you to upgrade the IPV5 whenever the company releases a new update. Attach the IPV5 to your computer via the included USB cable and using the downloaded software, run the upgrade. Simple. Painless. Now let’s have a Mac package, okay?
Lastly, Pioneer4You suggests charging the batteries outside the IPV5. We agree.
Real World Report
The YiHi SX330-200 chipboard is extremely precise and efficient for consistent power and flavor from every 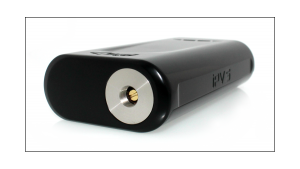 pull on any atomizer. The iPV5 is sleek and sexy, with an intuitive OLED display and an ergonomic design for a comfortable, yet powerful vape experience.
Some vapers may think the IPV5, loaded with dual 18650 batteries is a bit on the heavy side, and they are not wrong. It has some serious heft to it, but nothing that prevents long term use at any given time.
The placements of the buttons and the display, and the smooth curves, these all make for a truly smart device. The only possible assistance you might need is when you’re using the manual TCR mode, but then again, TCR values aren’t easy in either Joules or wattage.
In any case, with the advanced electronics inside the unit, using the Joule method for temperature control is no more intimidating than using wattage-based temperature control. Choose your wire material, choose the temperature, and vape.
I found the IPV5 not only comfortable to use, but powerful and easy to operate. This is an advanced mod, but you don’t really need to be an advanced vaper to enjoy it. Use it in wattage mode, or TC mode, without bothering the TCR technology and you’re getting an excellent device for an affordable price. Yea, I like the IPV5, and can’t wait to see the IPV6.
Conclusion:
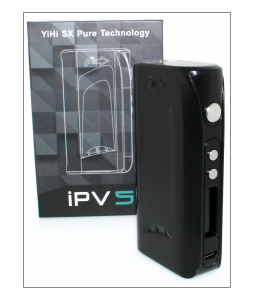 The Pioneer4You IPV5 is a $49.95 device at Element Vape. Considering the build quality, the 10-200w range, the Temp Control options, and the new YiHi chipset, $50 buys a lot.
Grade: A
“A powerful and versatile device using the latest chipset technology today. Very affordable for a 200W Joule based device, it would be difficult not to recommend it.”
Tom McBride
Pioneer4you IPV5 200W TC Box Mod Features:
- 18650 Dual Rechargeable Battery – Not Included
- Latest SX330-200 Chipset Technology
- Wattage Output Range: 10~200W
- Voltage Output Range: 1~7V
- Joule Output Range: 10~20J
- Minimum Atomizer Resistance: 0.05ohm
- Temperature Control Range: 212-572F
- Intuitive OLED Display
- Temperature Control Functionality
- Compatible with Ni200 Nickel, Titanium, and Stainless Steel
- Temperature Control of Resistance (TCR)
- Firmware upgradable by GUI Operate
- 5 Memory Slots
- Low Voltage Protection
- Low Resistance Protection
- High Input Voltage Warning
- Short-Circuit Operation
- Reverse Battery Protection
In The Box:
- 1 IPV5 Box Mod
- 1 MicroUSB Cord
- Instruction Manual
- Warranty Card


