Table of Contents [show]
It’s A Wrap!
Rebuilding Atomizers – Step One – The Wrap
I’m happy to report that I was given the green light the other day to continue on with this series on learning how to rebuild atomizers. The series will, hopefully, teach you not only how to rebuild any atomizer you choose to work with, but to also show you that it does take a lot of talent to do it, only the desire and commitment to do so. Don’t for a minute think that any of this is over your head, it isn’t.
Methodology
The way of I am going to teach is is to break it down into various exercises, to assign, not homework, but an exercise that when you complete it you will be able to easily apply that skill when the time comes. The first, primary, yet most important part of rebuilding an atomizer is learning to make good wraps.
Wrapping A Coil
In its basic terms, rebuilding an atomizer is the simple act of removing the burned out wick, which is material wrapped with a coil/wire, and putting another one in its place.
Some RBA’s come assembled with a fully working atomizer, or wick/coil structure, already in place, so all you need to do is test it by attaching it to your APV or multi-meter and checking what the ohm’s reading is. If it is within .1ohms of what its supposed to be you’re good to go. We’ll cover what you should do if it’s not later on, only because I’ve yet to get one that wasn’t within the .1ohm margin of error. All that’s left for the first RBA with a coil in place is to fill the tank with your favorite e-Liquid and start vaping. Guide To Vaping
If you buy an RBA that doesn’t have a wick/coil assembly in place or if you’re ready to replace the one you’re using now, the very first thing you need to be competent at is wrapping a coil. All this means is that with a few inches of wire you will wrap it around a wick. Of course the amount of wire you will actually use is miniscule, the rest of it is needed for your hands and fingers to grasp and wrap.Guide To Vaping
Preparation
When the time comes to really wrap some wire around a real wick you’ll have learned about preparing your wick, whether your wick is made up of stainless steel mesh rolled up into a tube shape, or some other wick material properly prepared, but I don’t even want you to have to worry about these things right now. What I am most concerned about is getting you to the point where you find it easy to wrap something with 3, 4, or 5 turns, all evenly spaced apart. That’s it. Once you do that you’ll be ready to move to the second phase, which is preparing your wick, stainless steel or otherwise. Guide To Vaping
Two Ways To Wrap
Guide To Vaping – There are two methods I use to wrap a coil. One way is to take a wooden match that you would use to start a fire in your fireplace, about 6 inches long or so, and the smaller wooden match that you would see in a box of matches that you can carry around in your pocket. These are the sizes we want to start with. When you learn how to easily wrap a large fireplace match you move to the smaller match and practice with that. Becoming proficient at both will give you the skill to move on to the more flexible material of real wicks.
The other way is to use a drill bit firmly affixed to some kind of vice. There are several YouTube videos that show wrapping a drill bit. Either way is fine. If you have the tools already, a vice that can attach to a table and a quarter inch drill bit about 5 inches high feel free to use this method at first. If you don’t have these things you can buy 2 boxes of matches at any grocery store, the long one and the short ones. For the sake of simplicity I’m going to use the wooden matches as I write this, but everything I say also applies to the drill bit firmly ensconced in the vice and standing straight up.
Wrapping
Kanthal Resistance Wire is cheap. You can buy 32 feet of it in a small spool for $7.99 at MyVaporStore. 32 feet will last you a long time. When you first begin wrapping you’ll waste a good amount of it but as you get better that waste will get less and less, but there will always be waste because the amount of wire it takes to do 3, 4, or 5 wraps around a wick a wick is tiny. Guide To Vaping
Preparing your wire, or annealing, and choosing the proper gauge (32 AWG or 34AWG) are things you shouldn’t even think about right now. All we care about, again, is learning to wrap. Although in the next piece we’ll certainly get into that.
Workspace – Since I am going to use wooden matches to wrap my wire around there is no reason I can’t do it while I’m sitting at my desk or the dining room table. I need to wrap my wire around the long match, first while it is sticking straight up in the air, and secondly, when it is sticking sideways out in the air. For both cases I use a block of wax. Actually is just a thick, round candle that I can push the match into about a third of the length of the match so that it’s nice and secure. As we move to the smaller match we’ll do the same thing, but expect the smaller match to be somewhat more difficult to master.
Let’s Proceed…
With the wooden match sticking in the candle so it’s sticking straight up in the air we take our wire and wrap. But wait! How long should the wire be? That depends on you, I’ve had people learn this way by holding onto the entire spool of wire and then there are people that cut anywhere from 6 to 10 inches long from the spool. I would suggest we start with about 10 inches (which sounds like a lot, and it is, but you want to feel secure, not clumsy.) We take 10 inches of wire, snip off the wire by holding our thumb and forefinger at the 10 inch mark, use our other hand and a small wire cutter (or just use your hand like a crank and turn the wire until it snaps off. The wire cutter way is better, in the short term and definitely in the long term as we get more precise).
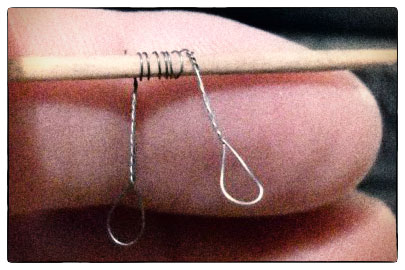
Holding the wire in our hands we just wrap the wire/coil on the wooden match going counter clockwise up from near the bottom of the match toward the top. I want the wraps to be snug, snug enough that if I remove the match from my wax block the coil won’t fall off the match, but not so tight that it digs into the match. This is the “heart” of our lesson today.
There are two factors to determine how many wraps you will make around the wick (match). The gauge of the wire and the material of the wick (match). We will arbitrarily wrap the match 5 times. After we’ve done our 5 turns, or wraps, we will snip the excess off the long end, leaving a good inch or two at the match end. We leave that inch or two because we’re going to be attaching that end to the posts of the atomizer. Guide To Vaping
Goals For Today
As I said above, you want to learn how to wrap a coil so that it is tight enough to stay where you wrapped it, but not so tight that it digs into the wick/match. You want it to snug, not overly snug. That takes practice and thankfully we can use and reuse the same wire do this. Guide To Vaping
The second goal is to learn how to wrap your wire around the match/wick so that they are “evenly” spaced. This too will take practice. You won’t get it perfectly even, no matter how often you wrap, but you will get it very close. During the testing phase you will learn how to manipulate the wire/coil so that you can attain the exact ohm setting you want by making the space between the wraps are as even as can make them.
Believe it or not, this is the most difficult part of rebuilding an atomizer. Getting comfortable with wrapping before we use a real atomizer or go through the steps of preparing the wire/coil will allow you to take the next step with confidence.
In a couple of days I will continue on with a talk about the two most popular gauges, 32 and 34, and what they mean and why you would want to use one or the other. I will also go over preparing the Kanthal wire and Stainless Steel Mesh. Until then, practice your wrapping and consider yourself successful if you can do 4 or 5 wraps that are amazingly spaced evenly apart. Guide To Vaping
Here are a couple of photos showing how they should look. I apologize for using “stock” photos. Whenever I attempted to photograph my matches they came out awful. Rather than post terrible photos I thought it best to show you a nicely detailed photo showing you how an evenly space wrap should look. I’m moving up to the iPhone 5 over the weekend and I hear the camera inside is much better than the one I tried to use. If that’s the case, I’ll attempt to take photos and maybe even a shorter video.
Until next time!


