Table of Contents
Last Updated on March 29, 2016 by
The Vision Eternity RBA Review
For the longest time I have been a bit overwhelmed with all the hoopla surrounding the ‘Rebuildable Atomizer’. I just couldn’t wrap my head around the fact that people would spend almost double the money for what is basically a clearomizer, albeit a clearomizer often made of metal and that allows you to not only replace the heating element and wick, you can also break it down to its bare parts and rebuild the whole thing. Even so, the clearomizers with replaceable atomizers/wicks is something I DO understand; but a completely rebuildable atty? Why go through all the headaches of completely taking apart the apparatus and put it back together with new wicking and metal coil?
Over this past year I have worked my way through the 510 and 808 -compatible cartomizers with mini-batteries to dual-coil cartomizers, to Dual-Coil Tanks, Clearomizers, Clearomizer 4+ and Clearomizer 5 with larger and larger batteries and now I’m about to get into the Rebuildable Vision Eternity.
As I’ve gone through each battery and, for the lack of a better word, an eLiquid storage container, I got closer and closer to perfecting the perfect vape (for me), which is a great amount of vapor production, a strong throat hit and maximum flavor.
In the beginning I believed that the quality of the eLiquid and the ratio of PG/VG was the only factor in getting a great vape going, but I have since learned that each part of the hardware, each different cartomizer, cartridge, and tank delivered a different experience as well. In fact even some of the finest eLiquid you can buy will taste somewhat different in each type of carto, tank, etc. you use. That being the case it became important to me to not only use different hardware but to learn how to get the most out of each one.
When looking at something like the Vision Eternity I kept asking myself if I really wanted to go there. “Wasn’t it enough to use a CE4+ or CE5, which allows me to hang on to my clearomizer hardware and just exchange the atty, and even the choice of changing the ohms with different heads?” I suppose not since I began lusting over the high precision RBA’s like the Vision Eternity.
But I managed to stay away from them for a while anyway.
MyVaporStore’s Vision Eternity ($23.50 “Deal of the Day” 12/4/12”) wound up in my hands a couple weeks back. Apparently Julia had received one from our “official” vendor (MyVaporStore) and she told me that in no uncertain terms I had to teach myself all about rebuildable attys whether I wanted to or not. If I didn’t want to do the review then that would be fine, but I still needed to learn about them, use them, and speak intelligently about them in case another staffer would be given the assignment and write a review based, partly, on what I had to say about them. After all, it’s my job.
Initial Impressions
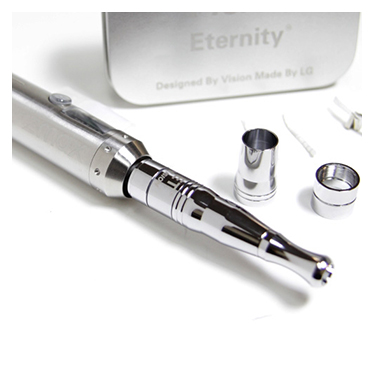
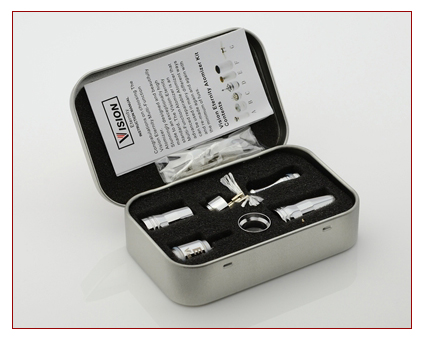
Julia handed me a silver colored metal case with the Vision Eternity inside, sitting in parts in their own small cutouts into the faux-felt inserts in the flip-top can. Each part was wrapped in protective sleeves. Just looking at it reminded me of some very expensive, finely crafted, high tech vaping gear. It looked as though the selling price would be more like $100+, yet the price was a quarter of that. In less than a minute I was enamored with the thing. Now I really wanted to learn all about them and use them properly.
Enamored. And a Little Scared.
First, I didn’t want to break it, and second, even if I learned how to work with it was I going to do all wrong. Rebuilding an atomizer like this one is a whole lot more than switching out an atty head. In order to get the most out of an RBA (Rebuildable Atomizer) you not only had to know how to take it a part and put it back together, you also had to know how wicks work and how much you can change the value of your vaping by how careful you are with the thin metal coil that gets wrapped around the wick and atty head itself. Supposedly the more you work with it the better you get, eventually. No matter what though, this was going to be a lot of work, and I hoped it was worth it all the steep learning curve.
The Warning
Rebuilding an atomizer like this requires a steady hand, determination, and a bit of testing. Most people use some sort of meter to test the resistance output of the atomizer after they are done with the rebuild. Build it wrong and it could short out your device, or worse, it could cause the battery to overheat if you use a device that doesn’t have short circuit protection, like Julia’s and Keira’s favorite, The Bolt. (Also my MyVaporStore)
Testing is Vital
I’m told that you can try out your builds using a ProVari or a Lambo or other high-end devices because if you do it wrong they will protect themselves and shut down. These high-end devices use a PCB (protection circuit boards) so that problems like this won’t happen, but I don’t feel like risking such an expensive vaping device (what if something went wrong the Provari or Lambo?); I’m going to buy what a lot of pros use, a Fluke meter, so that I can build them with some resistance accuracy.
One more thing…
It really does take a steady hand to rebuild an atty like the one in the Vision Eternity. If you suffer from shaking hands or excessive nervousness it might be a good idea to stick with something like the Vivi Nova or other atty tank that requires the easy replacement of the atty head.
I have placed an order for a meter and once it arrives I’ll try my hand at doing a rebuild. In Part 2 I’ll let you all know how it went. I’ll even try to create a vid of the rebuild and testing. Expect Part 2 in 10 days to a week. In the meantime, if any of you have experience with rebuilding an atty like this, please take the time to leave any helpful advice or warnings so that my success rate will be higher than I suspect it will without your input.
When you buy the Vision Eternity at MyVaporStore, you’ll get the following:
1 x 510 threaded base ” also the the coil and wick holder”
1 x eGo threading trim ring
1 x Spike assembly
1 x dripping cone “used for dripping mode”
1 x tank cartridge cone “used for tank cart mode”
1 x 510 chrome driptip
1 x pre-installed wick/coil assembly
2 x silicone ego-t type A tank bottoms
2 x wick/coil assemblies
1 x replacement spike wick
1 x extra set of push pins for the coil/wick assembly
Till the next time,
Tom McBride


