Table of Contents
Last Updated on April 16, 2024 by Team Spinfuel
Geek Vape Griffin 25 RTA Review
Any vaping enthusiast has heard of the Griffin 25 RTA. Geekvape Technology Co (or is Geek Vape?) is a respected name throughout the vaping industry, from their Griffin RTA’s, Tsunami RDA’s, Avocado RDTA’s and Eagle Sub-Ohm Tanks; they cover all spectrums of the market – devices, accessories and building materials. The quality of work and craftsmanship is outstanding, especially for a company that’s based out of Shenzhen, China and has only been around since 2015.
The original Griffin 22 is still an amazing RTA even today. The Griffin is the product that really gained popularity and that’s where I first heard the name Geek Vape. Planning to enlarge the original and well-respected Griffin 22 was a very smart decision and it was executed perfectly. The Geek Vape Griffin 25 RTA is innovative, a solid performer with top notch build quality and a crisp fit-and-finish. This is one of those devices every that Vaper who builds coils needs to have in their vaping collection.
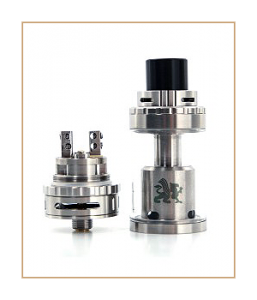
The Geek Vape Griffin 25 RTA is a 25mm Rebuildable Tank Atomizer crafted from high end Stainless Steel. It’s offered in a total of four options; Black or Stainless Steel and with top airflow or not. I own both top airflow versions and use them on a consistent basis.
The juice capacity is another standout feature at a massive 6.2ml for the non-top airflow tank and 6.0ml for the top airflow option. The Griffin 25 weights 23g heavier than the original but doesn’t physically feel like much of a difference.
Being such a tall tank at 65.4mm from the base to the drip tip you’d presume the flavor would not be as potent or comparable to a shorter tank. But the Griffin 25 is a ridiculously good flavor tank; depending on your build and wicking of course. Cloud production is also through the ceiling, the roof and to the moon at high wattages and truly provides a well-rounded RTA experience.
Geek Vape Griffin 25 RTA Top Airflow
The top airflow system is executed the way all top airflow tanks should be. It’s not just a top cap with air holes
 that only vents the drip tip. Air goes in to the four 5mm slots on the top airflow ring that can be easily adjusted and will stop when opened or closed. Under the top cap are four cutouts that when tightened down on the tank will feed airflow into the four holes on top of the chimney. Air then makes its way down the tank section which has a separate channel surrounding the actual chimney. In other words, if you take the base off and look inside, you’ll see a tube almost floating in the middle. The air going around that tube hits the top of your coils and comes back up the middle. It works extremely efficiently and you will notice a difference with it opened or closed.
Geek Vape Griffin 25 RTA Top-Fill
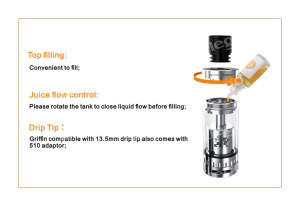
The Geek Vape Griffin 25 has a top fill system with two enormous 16.5mm x 4mm kidney shaped juice fill slots. You can literally just dump your eJuice straight from the bottle. The glass used is a high temperature resistant silica glass and also included is an additional frosted replacement glass which I absolutely adore. Even though it looks great it’s sometimes hard to see your juice flow control holes if they’re opened or closed.
The four 4.5mm x 2.5mm juice flow control slots are easily adjusted by spinning the tank when screwed down on a device. Just make sure when opening the juice flow, only turn it clockwise. I was turning mine both directions and I ended up loosening the glass section from the base and was getting leaks right above the airflow control ring.
The two 13.7mm x 2mm adjustable airflow slots around the base have a click-type system and can be adjusted 25%, 50%, 75% or wide opened. There’s plenty of airflow even without the top airflow but either way it provides a really big cloud flavorful experience. The 10.2mm ID Black Delrin wide-bore drip tip is held in snug with double O-rings. The top cap is not 510-compatiable, but by popping in the included 510-adapter the user can choose any 510-compatible drip tip. The 510-pin is gold plated and can be adjusted with a flathead screwdriver for use on a Mechanical Mod. I prefer the Griffin 25 over the smaller 22 simply for eJuice capacity. I’m used to having only 3-4ml of liquid available and have to refill often. So the 6ml+ is an amazing increase and a more sensible option for my style of vaping.
Geek Vape Griffin 25 RTA Build Deck
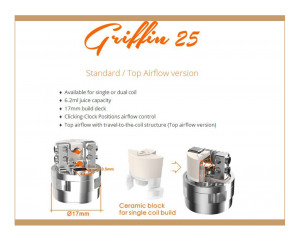
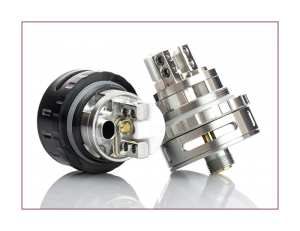
The Geek Vape Griffin 25 has a 17mm build deck and a side-tension two-post Velocity deck. The four post
holes are 2mm per and tighten your leads down with SS316 screws. Air comes in from the bottom airflow slots up through two 4.3mm x 3.4mm holes under each coil; forcing air up and around your coil. It comes with a silicone single coil adapter that works pretty well. Make sure to remove the cotton retention ring before trying to remove the preinstalled adapter. I thought you could pull it up and I wound up ripping it completely apart. Live and learn I suppose.
Having a single coil option (using the ceramic block) is great and can fit some fancy single exotic builds. The build deck is simple and straightforward to build on. You don’t need much experience building to properly install coils on this spacious deck. The only real challenge is perfecting your wicking technique and getting that balance of flavor and vapor with no leaking or dry hits. Once you achieve this, you’ll see the true potential of the Griffin 25 RTA and how truly superior it is to its predecessors.
Geek Vape Griffin 25 RTA Wicking

To properly wick the Griffin 25 is a method I use called ‘don’t stuff it, just lay it down.’ I know that sounds inappropriate so let me elaborate. Once you get your cotton through the coils, snug but not too tight, you’re going to fold your wicks down and cut them right at the ‘cotton ring’. I use Native Wicks Platinum Blend cotton and have never gone back to anything else. I’ve seen people remove the ring before installing cotton but I feel that causes unnecessary work, having to maneuver it back over your coils after the fact. Make sure you take your thinning tool – the tweezers that have a point at the end – and lightly comb through your wicks. All you’re doing is taking out some of the dead weight that will cause it to wick incorrectly. Cut the residual off and you’re ready to lay some wick.
This is the part that people get wrong and not just kind of wrong; horribly wrong. Just because there are juice flow channels doesn’t mean you should stuff your wicks in there and tighten that ring, which again scrunches your wicks you just worked so hard to fluff up. All you do is take the ends and just lay it on top of the ring over the juice canal. That simple.
I like to set all four wicks roughly in place and give the cotton a little juice prime just so I can mold the ends how I like. Make sure the cotton ends are lying on top covering the entire juice canal. No need to poke a little cotton through or make any type of air hole. Just make sure all the ends are lying on the cotton ring and you should be golden.
You want to position the wicks in a way that putting the chimney over the coils won’t snag or ruin your molded cotton. I like to line up two of the juice flow holes with each of the coils and start to lower the chimney while giving it a slight turn as I’m pushing it into place. If I feel like it went down rough or is snagging some cotton, I’ll pull it off and adjust wherever it touched and retry. I’ve wicked the Griffin 25 RTA many times using this method. I had to practice it a couple times to really find that perfect length of cotton and not thinning it too much but just enough to eliminate the chance of dry hits. It’s a balancing act that just takes practice, but hopefully doing it this way will make your Griffin 25 RTA wicking endeavors easier and more enjoyable.
The Wrap Up
The Geek Vape Griffin 25 RTA is a solid well-rounded atomizer. The only real negatives are potential user
errors and not so much the tanks fault. Learning how to build and wick is the key to success. Another thing you’ll want to do is scratch the code to check if your tank is authentic. I only say this because I bought a Griffin 22 RTA a few months back from a ‘Cigarette/Vapor Store’ and come to find out it was a fake and I had paid $35 for it. So learn from my own stupidity and only buy from legitimate businesses like Element Vape (online) and it’s always good to double check the authenticity anyway.
Final Grade – A
“The build quality is fantastic. Just so you take the time and learn how to do all the steps properly you will have an awesome vaping experience. Everything about this RTA from aesthetics, performance, all the extra pieces included in the box, including the little Orange Tri-Tool that I use constantly when building. I can’t recommend this one enough…”
Available Now at Element Vape
Team Spinfuel
Griffin 25 RTA by Geek Vape Features:
- 25mm Diameter
- 6.2mL Juice Capacity – Standard Version
- 6mL Juice Capacity – Top Airflow Version
- Superior Stainless Steel Construction
- High-Temp Resistant Silica Glass Reinforcement
- 10mm Black Delrin Widebore Drip Tip
- 17mm Spacious Build Chamber
- Side-Tension Vertical Two-Post Design
- PEEK Insulators – Made in U.S.A.
- Premium SS316 Set Screws
- Click-Clock Position Airflow Mechanism
- Bottom Airflow Control for Direct Air Channels
- Optional Top Airflow Control
- Juice Flow Control at Base
- Convenient Top-Fill Method
- Adjustable Gold-Plated 510 Contact Pin
Includes:
- 1 Griffin 25 RTA – Standard or Top Airflow
- 1 Black Delrin Widebore Drip Tip
- 1 Replacement Glass Tube
- 1 510 Drip Tip Adapter
- 1 Allen Key
- 2 Ceramic block
- Spare Parts


