Table of Contents
- 0.1 The Skystar Revvo Starter Kit in a Nutshell
- 0.2 Initial Impressions of the Skystar Revvo Kit
- 0.3 The Touchscreen
- 0.4 A Terrific Demo Video for the Skystar Revvo
- 0.5 The Strange Revvo Sub-Ohm Tank
- 0.6 Performance of the Revvo Sub-Ohm Tank
- 0.7 Vaping with the Aspire SkyStar Revvo Mod Kit
- 0.8 Battery Life
- 0.9 Using the Aspire Skystar Revvo Kit
- 0.10 Wrapping Up and Score
- 1 B+
Last Updated on June 4, 2019 by
It’s been 13 days since we published the Preview for the Aspire Skystar Revvo Starter Kit. Today, the full in-depth review. Let’s begin…
The Skystar Revvo Starter Kit in a Nutshell
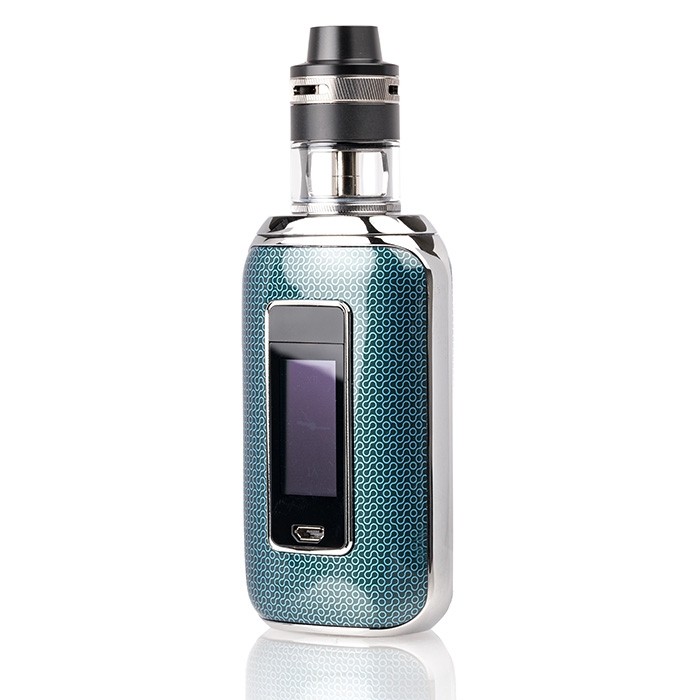
Aspire’s Skystar 210W TC Box Mod with the Revvo Sub-Ohm Tank has a maximum output of 210W, which is common in today’s market. It features a touchscreen interface, and full temperature control modes. Featuring a full 1.3-inch touchscreen (vertically), it displays all the information a Vaper needs at a glance.
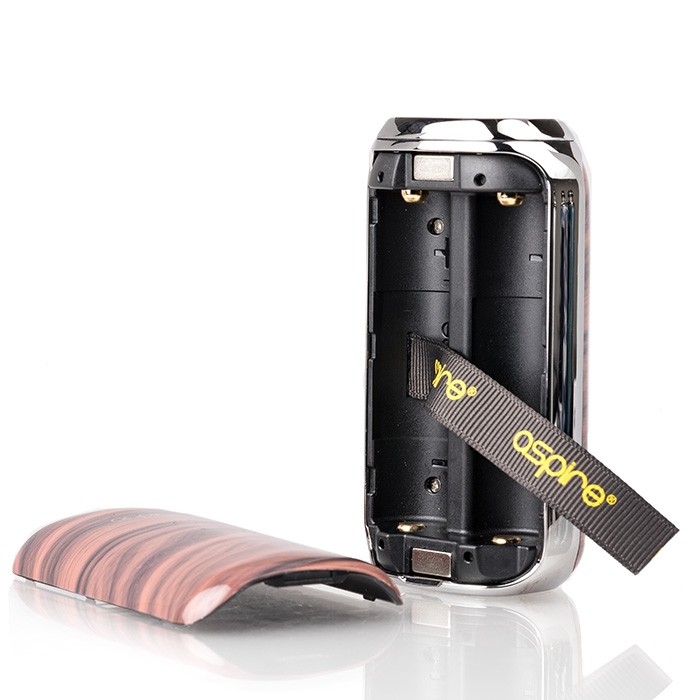
Users can browse through the Skystar’s interface by swiping the screen (more on that below). The Skystar uses a large magnetic battery access door for two hi-amp 18650 batteries and the user can charge inline at 2A maximum current. (we advise external Nitecore Chargers however)
Included with the Skystar 210W TC Mod Starter Kit is the Aspire Revvo Sub-Ohm Tank. The tank is 24mm, with threaded top fill system that uses an innovative(?) spring-loaded cap inside the drip tip, and the new horizontally orientated ARC (Aspire Radial Coil) coil head.
The Revvo holds up to 3.6ml of e-Liquid. The Revvo Tank employs a unique stove top style coil and fill system, with a wattage range of 50 to 100W, with an optimal range of 80 to 85W.

Initial Impressions of the Skystar Revvo Kit
I am not convinced that the new sub-ohm tank, the Revvo Sub-Ohm is “innovative” or simply “insane”. When I first approach a new Tank, or Mod, I attempt to set it up and getting to work without looking at the manual. I figure that any vaping instrument should be easy enough to use with as little complication as possible. Truth is, a whole lot of people hate reading manuals.
The Aspire Skystar Mod was easy enough to put together, it just needed a couple of hi-amp 18650 cells. Pop off the rear panel, insert the batteries, and you’re done. Navigating the menu however, was not so easy at first. Despite knowing this was a Touchscreen device, there is nothing that screams out how to activate the touchscreen. I spent a stupid amount of time tapping on the screen, moving left to right, and so on…Anyway, batteries in, a few clicks on the Fire Button (practically hidden directly above the display) and the large, bright, screen came to life. Now what?
The Revvo Sub-Ohm was even more complicated. I looked at, turned it and twisted it, and practically threw it across the room, trying to figure out what this tank was and how the hell I was supposed to use it. Where was the filling slots? For that matter, where were the coils??
During the first 2 days of my official review period (I did not write the Preview by the way), I dismissed the Revvo Tank and went about learning and using the SkyStar Mod with different sub-ohm tanks, including the TFV12 Prince (reviewed here) and the Freemax FireLuke Mesh (reviewed here). I told myself that once I understood the Mod, I’ll tackle the strange sub-ohm tank.
The Touchscreen
Activating the touchscreen is the key to controlling the SkyStar Mod, naturally. To activate it, the user takes a finger and swipes from the top of the screen to the bottom, twice. If you’re lucky the system menu appears. If not, try, try again.
For myself it was many frustrating attempts to activate the menu system. It was only trial and error that I learned that my finger (any finger will do) must be clean and dry. If you have any eliquid residue on the tips of your fingers, or just body oil from a hard day at work, it is going to take several double-swipes to activate the screen. Then, once you do, you’ll have left behind some of the eliquid residue on the screen itself. Make sure you clean the screen with a dry cloth when you’re done. Because you’ll find yourself needing to enter the menu system fairly often, make sure to clean and dry the finger you choose to use, it will make your life easier when dealing the Mod. (12 day in and I’m still not getting into the menu system on the first swipe)
A quick lesson learned, if you’ve paid attention to the idiosyncrasies of activating the screen, a quick double-swipe downward will bring up the menu and display the following information, or rather the first level of navigation.
Modes
Data
System
Time
(exiting the menu system at any time requires just a tap on the fire button)
The menu “modes” are self-explanatory and I would be wasting your time explaining each one. (see the video in this review for an excellent demonstration on using this Mod and Tank.)
The Menu item we’re most interested in here is the first one, Modes. For me, I’m a Wattage guy, so tapping on the Watts button puts the SkyStar in wattage mode. To adjust the wattage takes a whole new double-swipe… this time two swipes from the bottom of the screen to the top. If you’re lucky, with clean and dry fingers, the next screen shows up promptly.
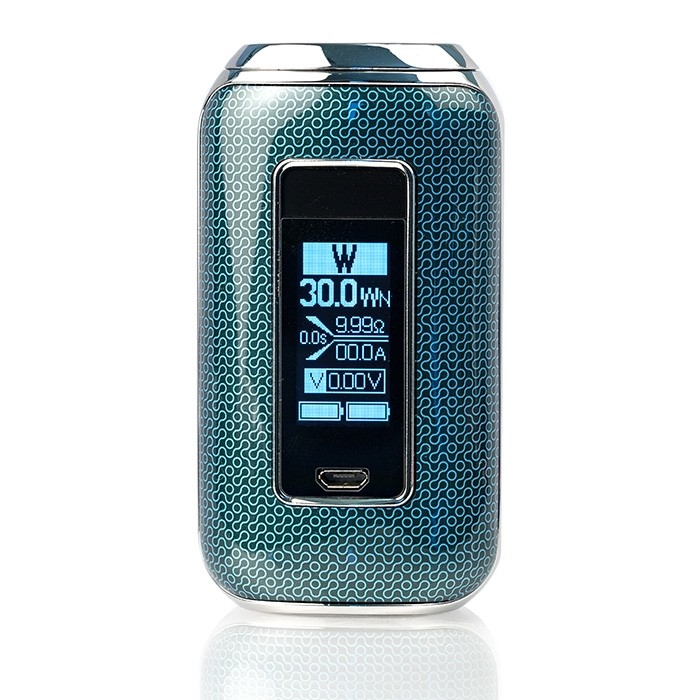
It is there on the Wattage screen that you’ll see the current wattage, under that is the box that tells you if the ramp up is set to Hard, Soft, or Normal. I chose the default, Normal.
Directly under the ramp up is the large Plus and Minus touch buttons. The user can tap either one to move up or down the wattage scale, or a steady press on either one will send the wattage up or down quickly.
When you’re done, press the fire button and you’ll exit out and go back to the default wattage screen, loaded with information about your vape setting, including dual battery icons that can tell you how your batteries are discharging. I like dual battery icons because it will tell you when your batteries are wearing out and not holding a charge as well as it should.
In your down time you can access the menu screen again and customize your vape even further. Set the time (digital or analog), set the screen brightness, how long the screen stays lit up, the length of the vape pull, even TCR settings. It’s all there, including ByPass mode, Voltage Mode, and Temperature Control. Once you’re in, making the settings is as easy as touching the screen.
The Strange Revvo Sub-Ohm Tank
As you can see in the photos, the Revvo is a top-airflow tank. That’s the easy part. This is one of the strangest coil systems I’ve ever seen or used. The airflow enters the Revvo Sub-Ohm Tank via the adjustable airflow slots which measures at 10.5mm by 2.5mm for each air slot. The drip tip is a 12mm wide bore.
In a nutshell, here are the bullet points on this Revvo Tank
- Top-Cap Airflow – Adjustable airflow controls at the top of the tank is said to prevent leaking, and maybe that is so. I certainly haven’t experienced leaking with this tank. The top airflow of the SMOK TFV8 X-Baby is similar.
- New ARC Coil System (Aspire Radial Coil) – This is one strange feature that drove me crazy while I learning to configure it. Afterwards, it was simple, and quite nice. The Revvo uses a pre-made coil with a horizontal design using spiral Kanthal wires. The coil life is, so far, holding its own. 12 days of use and it’s still producing good flavor and good vapor.
- Refilling the Tank – This is by far the easiest way to refill a tank. This is a spring-loaded system that allows you to refill without having to remove or slide anything to the side. However, is it so different that it could be rejected by the vape community? We will find out.
- Maintenance? – Dissembling and Assembling the Revvo Tank will, in time, become easy. But in the beginning, it’s a bit confusing. And if you have hot-dog fingers, lifting the coil disc out and replacing it can be cumbersome. Still, I have no real complaints here, other than the fact that if a user wants to use a MaxVG or a coil-killer eliquid, it might need a thorough cleaning more often than other tanks. It’s too early to tell, and I avoid coil killer ejuice.
Performance of the Revvo Sub-Ohm Tank
Is the Revvo Sub-Ohm Tank a performer? Well, yea, but certainly no better than most others. The flavor fidelity is excellent, the vapor production is, I would say, very good, but just ‘very good’. The question is; is the new Radial (read: circular disc) innovative enough to be adopted by others? I just don’t’ know at this point.
In terms of overall performance as a good Sub-Ohm Tank, it’s certainly not bad. Plus, it’s not nearly as “thirsty” as other tanks I own. Without a doubt, filling and refilling the tank by sticking a dropper or needle nose into the plunger tip is easy. But still, look at other top fill tanks and these days most are made to simply slide the top cap to the side to reveal a large fill hole. Why is this better?
Vaping with the Aspire SkyStar Revvo Mod Kit
The exposed parts of the exterior of the SkyStar are chromed. However, the Skystar Mod, sans batteries, is ultra-lightweight. Is the chrome finish over metal? Is it Plastic? Does it matter? The takeaway here is that the Mod is super light.
Battery Life
Using two Nitecore 3100mAh 35A cells the battery life is no better or worse than most other dual 18650 Mods. The recently reviewed VGOD Elite 200W Mod uses the same dual 18650 set up and the battery life with the VGOD is a lot better than the Skystar, or anything else I’ve used in the past couple of years. That said, with two fully charged hi-amp batteries you can expect 4 or 5 hours of moderate to heavy vaping before a swap out is needed. The battery charge level icons seem to be accurate. But if any reviewer tells you that the Skystar will last all day with moderate vaping, they’re not telling you the truth.
Using the Aspire Skystar Revvo Kit
Like the Vaporesso Switcher (preview), the Aspire Skystar uses a front panel fire button. However, the fire button on the Skystar is nearly flush with the display and disappears into the silver bezel display area. Like the Switcher, it takes a little getting used to if you’ve been vaping with a side panel/side button fire button, though it’s an easy adjustment to make.
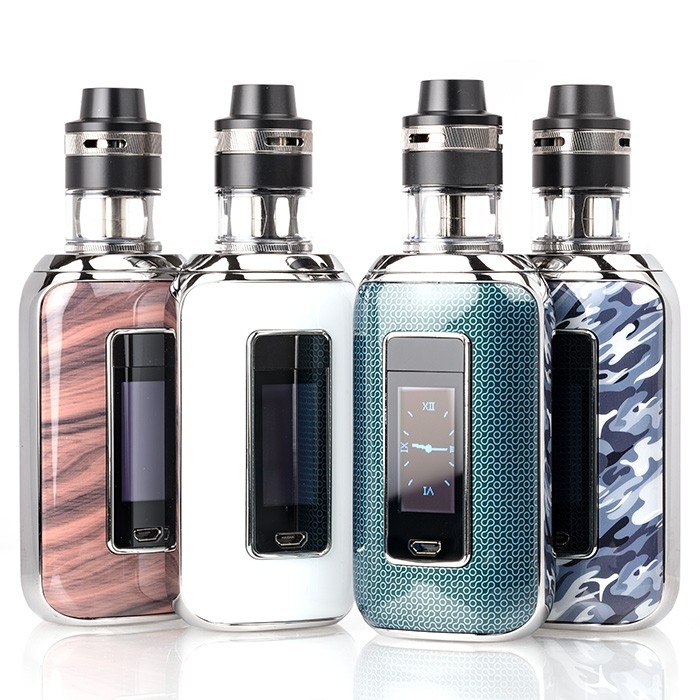
No matter which color you choose; black carbon fiber, blue camo, slate blue, woodgrain, or white, the Skystar is drop dead gorgeous. And shiny! So shiny!
Priced about the same as many other Starter Kits of this caliber, the decision to buy will most probably come from the aesthetics you see in the photos or in person at a vape shop. 210 Watts is common today, and many SMOK Mods go up to 220 and 230 watts, but not many people will even need 200+ watts anyway. The Revvo tank will definitely serve its purpose, but the coil replacements are not cheap. A 3-pack will set you back about $15.
Wrapping Up and Score
The Skystar Revvo Kit is a nice set up and there is value here. If you’re looking at it, and you understand the strange new disc coil heads, I don’t think you’ll be unhappy with your purchase. The definite Pros of this kit is the Flavor fidelity of the Revvo Tank.
For good looks, performance, and value, the Skystar Revvo Kit earns a definite:
B+
Available at HealthCabin
Aspire Skystar Revvo Specs and Contents
Aspire Skystar 210W Features:
- 5 to 220W Output Range
- 0.1 to 0.5-ohm Atomizer Resistance Range
- 0.5 to 9.0V
- Bypass mode
- Preheat Function
- Firmware Upgradeable
- Temperature Control Suite
- Ni200 Nickel Support
- Titanium Support
- SS316L Support
- Adjustable Three Memory TCR
- Fine Tune Temperature Output
- CPS (Customizable Power Settings)
- Preheat Functionality
- Resistance Lock
- 200 to 600 Degree Fahrenheit Range
- 1.3-inch Touch Screen
- Automatic Display Adjustment
- Output Temperature
- Output Wattage
- Output Voltage
- Material and Mode Selection
- Atomizer Resistance
- Output Current
- Individual Battery Life Indicator
- Real Time Clock
- Adjustment Lock
- On Board Charging
- 2A Max Charge Current
- Micro USB Update and Charge Port
- Magnetic Battery Access Door
- Gold Plated Connections
- Accepts Two High Amperage 18650 Batteries
- Sold Separately
- Stainless Steel 510 Threading
- Spring Loaded Gold Plated Contact
- Automatic Cut Off/Short Circuit Protection/Overheat Protection/Over Charge Protection/Over Discharge Protection/Reverse Polarity Protection
Product Dimensions:
- 91mm by 50mm by 33mm
Aspire Revvo Sub-Ohm Tank Specs:
- 24mm Diameter
- Stainless Steel Protective Glass Sleeve
- Threaded Top Fill
- Single Spring-Loaded Fill Port
- 3.6ml Tank Capacity
- Triple Top Adjustable Airflow
- 10.5mm by 2.5mm Each Air slot
- Fully Closeable
- ARC (Aspire Radial Coil) Coil Family
- Horizontal Orientation
- 0.10 to 0.16 ohm
- 50 to 100W
- 80 to 85W Recommended
- Kanthal AF Wire
- Organic Cotton
- Drip Tip Acts as Drip Cap
- 12mm Wide Bore
- Stainless Steel and Glass Construction
Product Includes:
- One Aspire Skystar 210W TC Box Mod
- One Aspire Revvo Sub-Ohm Tank
- Two ARC 0.10 to 0.16-ohm Replacement Coils
- Protective Silicone Cap
- USB Cable
- Spare Parts
- User Manuals
- Warning Card


